
 My goal is to find sealants that form a hard, durable, reliable seal so I don’t have to worry about my polymer clay surface treatments getting scratched off.
If there’s no surface treatment, such as mica powders, paint, pastel powders, metal leaf, etc., then polymer clay doesn’t need a sealant. Sanding and buffing should give it a nice shine, if that’s what you want.
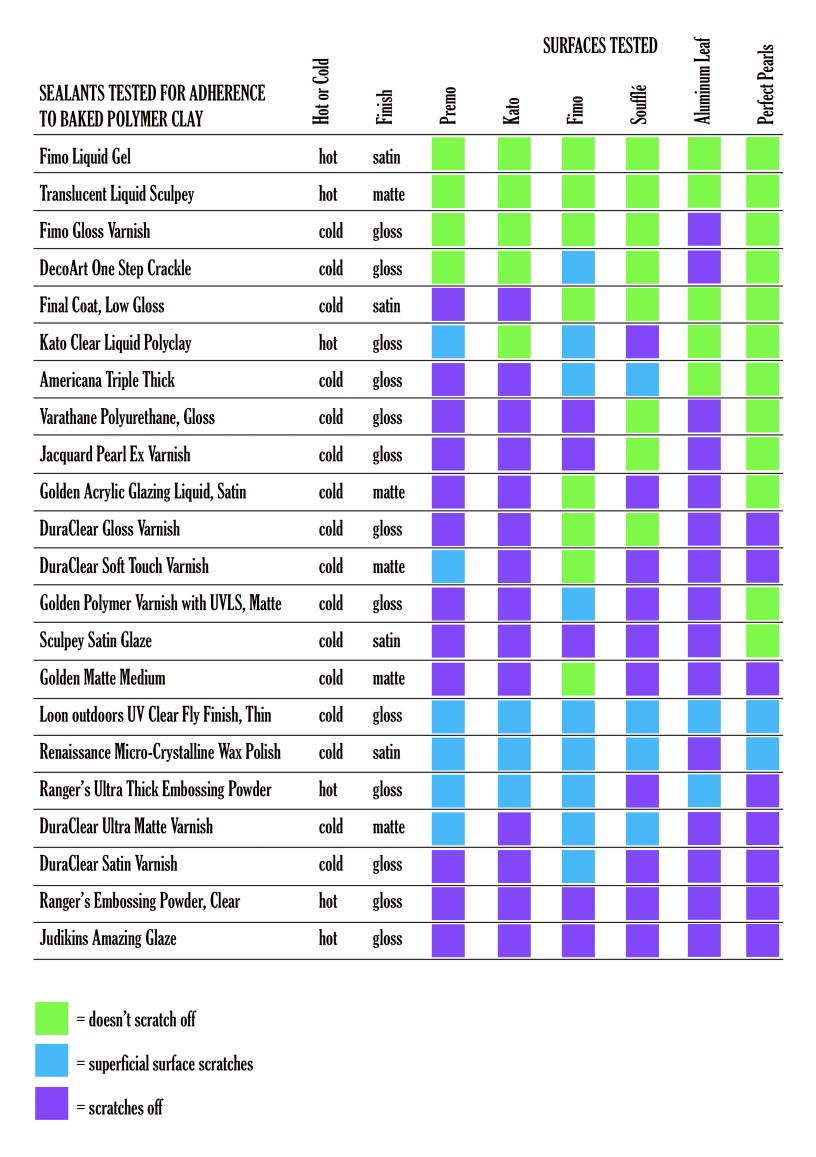
HOW TO INTERPRET THE CHART
The chart lists the sealants in order of best performance. It reflects the best results I was able to get after trying different methods. Please read this complete post for details. Curing times and temperatures for liquid clays make a big difference.
Sealants that need heat to dry are indicated by “hot” in the chart above. Sealants that just need to air dry are indicated by “cold.”
I’ve also indicated whether a sealant is matte, satin or gloss.
I’d rather not have superficial surface scratches. I guess they’re better than a sealant scratching off entirely and ruining the surface treatment below. Clay without a sealant gets scratched, after all. Superficial scratches could be buffed out, or a matte surface touched up with super fine steel wool.
TESTING METHODS
Using my gloved finger, I dabbed one coat of 22 sealants onto these six surfaces:
- baked Premo
- baked Kato
- baked Fimo
- baked Soufflé
- Aluminum leaf on Premo
- Perfect Pearls on Premo
First, I dabbed on the embossing powders and liquid clays that needed heat to cure. After the clay was cool, I dabbed on the sealants that needed to air dry. The Loon UV Resin was set with a Loon UV flashlight for less than a minute. The instructions say it will harden within seconds.
After waiting 24 hours, I tried repeatedly to scratch the sealants off with my fingernail.
LIQUID CLAYS
The recommended temperatures for liquid clays are:
- Fimo Liquid Gel––Don’t heat above 265˚F
- Translucent Liquid Sculpey––275˚to 300˚F for 15 to 30 minutes. Higher temperatures increase translucence. Do not exceed recommended time or temperature.
- Kato Clear Liquid Polyclay––300˚to 350˚F for 20 to 30 minutes. Do not exceed 350˚.
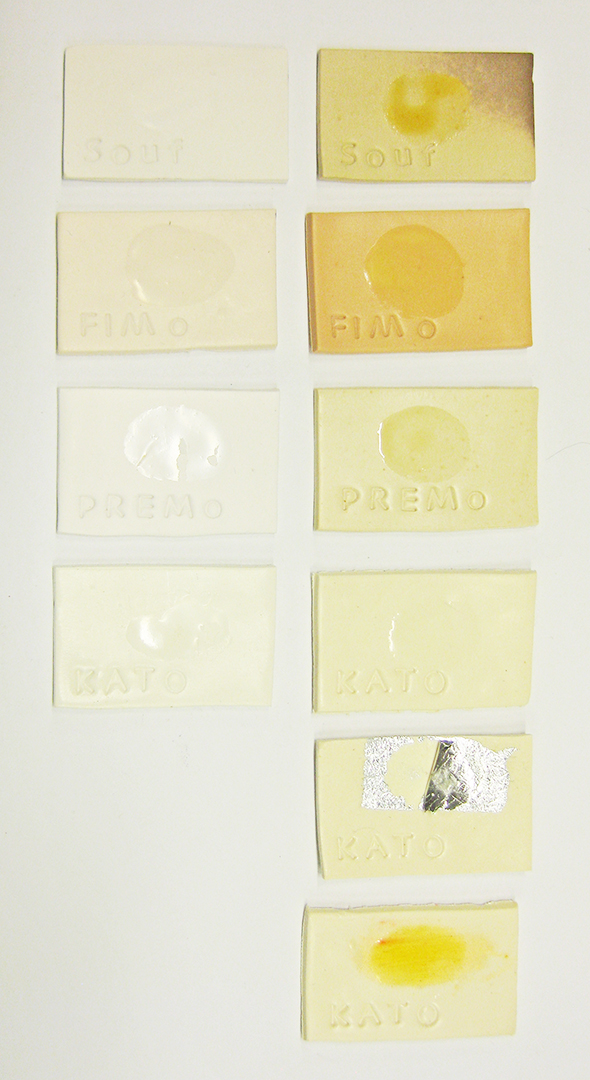
Trying to bake all the clays at 300˚ for 30 minutes so Kato Liquid Polyclay wouldn’t scratch off was a disaster. Kato Liquid Polyclay didn’t scratch off, but the white clay turned yellow, orange and brown. (See photo below.)
So I decided to try a heat gun. In my limited experience with a heat gun, I’ve had smoke rise, bubbles form and clay crack, all very quickly. It’s a bit scary, so I’m cautious.
I made six attempts to cure the liquid clays with a heat gun so they wouldn’t scratch off of the four brands of clays. I put the clay on a ceramic tile on a concrete floor in the garage and held a heavy-duty heat gun 6″ away from the clay. I’ve found that getting closer for too long causes bubbles, smoking and cracking.
This is what worked for me:
- Fimo Liquid Gel: 1-2 minutes with a heat gun on low setting, then a quick blast on high setting.
- Translucent Liquid Sculpey 4-5 minutes at 300˚ on low setting
- Kato Liquid Polyclay: 9 minutes at 300˚ with heat gun on low setting, then one minute on high setting at 350˚.
It takes about 4 minutes just to reach 300˚. It’s a rather long process and smells like baking polymer, so I wear a mask.
There’s a new tutorial by Debbie Crothers: Curing Kato Liquid Clay and So Much More. I haven’t bought it yet, but it probably would have saved me a lot of trial and error.


EMBOSSING POWDERS
The three embossing powders simply say to melt with a heat gun. No temperature or duration mentioned.
To adhere the embossing powders, I tried Ranger’s Perfect Medium, but it turned yellow when heated. Versamark Watermark Ink remained clear.
In my first attempt to cure them, I used a heavy-duty heat gun on low setting about 6″ away from the clay until the embossing powders melted. Then I turned it on high for a short burst. They were cooked for about 1-2 minutes total. It was easy to gouge all three with my fingernail after they were cool.
In my second attempt, I used the heat gun for 4-5 minutes until the temperature rose to 316˚. It was still easy to gouge them.
In my third attempt, I used the heat gun for 3 minutes at 350˚. It took 5-6 minutes to reach that temperature, so this was the longest curing time yet. UTEE got superficial scratches, but didn’t scratch off of the aluminum leaf. The other two embossing powders gouged and scratched off.
In my fourth attempt, I used the heat gun for 6 minutes at 350˚. After 4 minutes, the embossing powders started to yellow and bead up, but I kept at it. UTEE was a bit harder than the other two, but all three still scratched or gouged off. My conclusion is that embossing powders and polymer clay don’t work well together.
UV RESIN
The Loon UV resin hardened, but the surface remained greasy, regardless of how long it was under the UV resin flashlight. It works well for fly fishers, so I’m not sure what I’m doing wrong. I tried it on card stock and also set it in the sun for hours. I live in a dry climate at high altitude, so humidity or lack of sunshine isn’t the problem. It would be worth trying other brands because UV resin is thick and tough and would be less likely to collect dust because it dries immediately.
ALUMINUM LEAF
The first time I tested aluminum leaf, I used Martha Stewart Craft Guilding Adhesive on baked clay. All sealants and aluminum leaf scratched off.
I decided to try again and put the aluminum leaf directly onto raw clay and baked it. Translucent Liquid Sculpey (TLS) was the only sealant that didn’t scratch off, but only if heated to about 300˚with a heat gun. TLS becomes more transparent at higher temperatures, too.
I tried baking the clay, applying TLS as an adhesive, then aluminum leaf and baking again. With this method, five sealants didn’t scratch off.
Without a sealant, the aluminum leaf scratched off easily with all three methods I used to adhere it.
It’s hard to see the sealants on white clay in the photos I took, but on the sheet below with aluminum leaf you can see where I was able to scratch them off. Notice how some are more transparent than others.

SEALANTS
In the photo above, the sealants are in the following order:
- Ranger’s Ultra Thick Embossing Powder, Clear
- Ranger’s Embossing Powder, Clear
- Judikins Amazing Glaze
- Kato Clear Liquid Polyclay
- Fimo Liquid Gel
- Translucent Liquid Sculpey
- Varathane Polyurethane, Gloss
- Americana Triple Thick
- Jacquard Pearl Ex Varnish
- Fimo Gloss Varnish
- Sculpey Satin Glaze
- Final Coat, Low Gloss
- Golden Matte Medium
- Golden Polymer Varnish with UVLS, Matte
- Golden Acrylic Glazing Liquid, Satin
- DecoArt One Step Crackle
- Renaissance Micro-Crystalline Wax Polish
- Loon outdoors UV Clear Fly Finish, Thin
- DuraClear Gloss Varnish
- DuraClear Satin Varnish
- DuraClear Ultra Matte Varnish
- DuraClear Soft Touch Varnish
All the “cold” sealants clean up with water.


CONCLUSION
If I had to pick only a few sealants, I’d pick the first four on the chart. They’re a mix of matte, satin and gloss finishes. They generally withstood repeated attempts to scratch them off.
Liquid polymer clays gave the best results, which shouldn’t be a surprise, since they’re the most compatible with polymer clay. A very thin layer of translucent polymer clay can also make a good seal.
If DecoArt One Step Crackle is applied very thinly, it practically doesn’t crackle.
It’s important to note that different sealants perform better on different surfaces. Many of these sealants aren’t meant for polymer clay, mica powders or metal leaf.
Final Coat and Renaissance Wax are very thin and would probably benefit from multiple coats.
I tried Ranger’s Distress Crackle Paint, but it completely flaked off the clay as it dried.
NOTES
Many of these sealants need to be used in a well-ventilated room. Be sure to follow the directions on the label. Good ventilation pertains to using a heat gun, too, as cooking with it makes fumes.
It’s important to test any sealants for yourself. If you’ve found the perfect sealant, please let me know.
I’ve read of sealants becoming sticky over time, so I’ll repost results after a few months to see if any sealants have changed. Please read Ginger Davis Allman’s very thorough testing over a period of months.
P.S. I bought all these products myself and received nothing from the manufacturers.

EMBOSSING POWDERS … I put mine on raw clay and bake for normal temps 275* for 45 mins and have had good results. I only had one that gave me any issues and I think it was the silver flakes as they got a funny tint.
LikeLike