
I wanted a consistently good quality image when transferring to polymer clay that I could bend and mold without wrinkles. My normal method has been to use laser printouts on plain paper.
If I want a flat transfer, I tape a paper-thin piece of baked polymer to a piece of paper and run it through my laser printer using the film setting. It works beautifully, but do it at your own risk!
PRODUCTS USED
Three of the papers I tested were for laser printers and three were for ink jet printers. I’m sure there are more ways to transfer an image to clay, so this is not a comprehensive or extensive test. Also, different brands of clay may work differently.
Papers I tested for laser printers:
- Domtar First Choice Copy Paper (or probably any quality laser paper will work)
- Magic Transfer Paper sold by Create Along
- Avery Laser Labels Paper (the waxy paper carrier left after you remove the labels)
Papers I tested for ink jet printers:
- Silhouette Printable Tattoo Paper
- Lazertran Inkjet Waterslide Decal Paper
- Avery Light Fabric Transfers Paper #3275 (t-shirt paper)
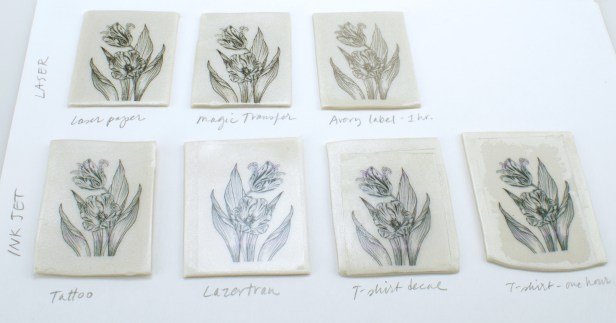
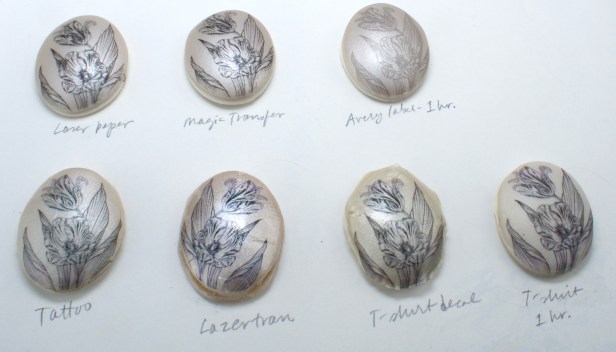
I used Premo pearl-colored clay, an HP Color LaserJet Pro M452nw laser printer and an Epson Stylus Photo 1400 ink jet printer. I chose to use a fine line B&W image to keep things simpler. A color image can also be used.

METHODS, QUALITY AND PROBLEMS
DOMTAR – I placed the printed image face down on the raw clay and gently rubbed to remove any air bubbles and make good contact. Without waiting, I misted the back with water and rubbed it with my finger. I gently repeated this until the paper was removed and let it dry. Cheaper papers also work, but I’ve found that a good quality laser paper works better.
Quality and easy of use: If all goes well, it’s easy and gives a good quality image that’s easy to bend.
Problems: If you mist and rub too fast, chunks of paper with the image on it can come off. Fibers can also stick to the image. If so, allow it to dry so you can see where the fibers are and repeat the mist/rub procedure.
As with all laser transfers, if you leave the transfer on the clay too long before handling or baking, the toner will become sticky and smear. I try to use it right away. You can add a light layer of cornstarch, which allows you to handle it without smearing. The cornstarch washes off after baking.
MAGIC TRANSFER PAPER – I followed the instructions included with the paper. Basically, place image face down on raw clay, rub with your finger for a few seconds, run under a gentle stream of water until the paper dissolves and let dry.
Quality and easy of use: If all goes well, it’s very easy and gives a good quality image that’s easy to bend.
Problems: Sometimes pieces of the image get displaced or float away when you put it under a stream of water. Sometimes you get fibers that won’t release without bringing the image with them. The instructions say the fibers become invisible if you coat it with liquid clay. As with all laser transfers, if you leave the transfer on the clay too long before handling or baking, the toner will become sticky and smear. (See Domtar above for solutions.)
AVERY LASER LABELS PAPER – This is the waxy paper carrier that’s left after you remove the labels. Either side seems to work. I placed the printed image face down on the raw clay and gently rubbed it to remove any air bubbles and make good contact. I waited 12 minutes and pulled off the paper. I’ve tried different lengths of time and that seems to work the best. If I leave it on longer, it gets darker, but the toner also gets sticky.
Quality and easy of use: It makes a beautiful and easy transfer.
Problems: It’s light in color. As with all laser transfers, if you leave the transfer on the clay too long before handling or baking, the toner will become sticky and smear. (See Domtar above for solutions.)
SILHOUETTE PRINTABLE TATTOO PAPER – I followed the instructions included with the paper. Basically, rub down the supplied adhesive sheet onto the printed image, peel away the clear plastic layer, put the image face down on raw clay and wet the back with water until the paper backing slides off.
Quality and easy of use: The image has a dot pattern which comes from the adhesive, so it’s not the best quality. The process is a bit complicated compared to others. It doesn’t get sticky.
Problems: It wrinkles when bent, but less so than others I tested.
LAZERTRAN INKJET WATERSLIDE DECAL PAPER – I followed the instructions you can download specifically for polymer clay. I placed the printed image face down on the raw clay and gently rubbed it to remove any air bubbles and make good contact. I waited 30 minutes and placed it in a bowl of warm water for 3-4 minutes then swished the water until the paper floated off.
Quality and easy of use: It makes a beautiful and easy transfer.
Problems: It’s on a fairly thick, shiny film which wrinkles when bent. The film turns a bit orangish when baked and it’s kind of sticky.
The instructions say if you leave it for hours the film will become soft. It does indeed become softer and it develops small wrinkles overall. These wrinkles stretch out as you bend the clay. In my one attempt of leaving it overnight, the clay and the transfer cracked. (See photo below.) I think it would have worked if I hadn’t pushed it so far.

AVERY LIGHT FABRIC TRANSFERS PAPER #3275 (T-shirt paper) – I tried this two ways: decal and direct transfer.
DECAL METHOD: Brush a light coating of liquid clay onto the image and cure it with a heat gun. Peel this “decal” off and adhere it to raw clay with more liquid clay. (I learned this from Mags Bonham and others. Mags has a class on both fabric transfer paper methods on Craftcast.)
Quality and easy of use: It makes a beautiful and easy transfer that doesn’t get sticky.
Problems: It wrinkles when you try to bend it. For gentle bends or curves it would probably be fine. It turned a little yellow when baked, probably because I used Fimo Liquid Gel and baked it at 275˚F, which is hotter than Fimo likes.
DIRECT TRANSFER METHOD: To make a transfer, I placed the printed image face down on the raw clay and gently rubbed it to remove any air bubbles and make good contact. Then I left it for an hour. You can leave it as long as overnight. Some parts didn’t transfer after an hour, so I rubbed them some more and tried removing the film from different directions. (I learned this technique from Michele Tobler-Sutter.)
Quality and easy of use: If you don’t need immediate results, it makes a beautiful and easy transfer that doesn’t get sticky. It has a nice matte finish.
Problems: It takes longer than other methods, but is worth the wait. You may have to rub down parts that didn’t transfer. I’ll explore this method more as it was my favorite.

CONCLUSION
Laser transfers on a quality laser paper (such as Domtar First Choice Copy Paper) or on Magic Transfer Paper offer great, detailed images which bend without wrinkles. With both you may have to deal with unwanted paper fibers. You also can’t let them sit very long because the toner gets sticky as it interacts with the polymer. Avery label paper is easier and doesn’t have a problem with fibers, but the transferred image is light.
The ink jet transfers I tested involved a film, except for the direct t-shirt paper transfer. The problem with films is they wrinkle when bent or put into a mold. Some wrinkle more than others. Tattoo paper puts a dot pattern into the image which reduces its quality. Lazertran turns orangish when baked and becomes sticky overall.
My favorites which gave a quality image that bent without wrinkles were:
- Avery Light Fabric Transfer paper using the direct transfer method (not a decal)
- Domtar First Choice Copy Paper
- Magic Transfer Paper
Specialty transfer papers can be pricey, so a good laser copy paper is probably the most economical, quality solution. Rather than using a whole sheet of a specialty paper, you can print out your image on plain paper, then cut a piece of the specialty paper just the size you need, place it over the image on your printout, securely tape the leading edge and print it again.
It’s a good idea to put a protective seal over transfers after they’re cured so they don’t get damaged. I find liquid clay is the most compatible and doesn’t scratch off.

If you can, do your laser transfers well ahead of time. I have found that if you leave them be for some time the stickiness completely resolves and they become handleable again. Somewhere between 2 weeks and a month is required for this to happen.
If you are in a hurry the cornstarch works fine or I have used a diluted solution of Golden matte with UVLS to seal the surface.
Of course, we are all in a hurry so the option in paragraph one is usually not ideal…but it is great not to have to use any coating at all to potentially obscure your image!
LikeLike
Thanks, Claire!
LikeLike
Hi Phyllis, thank you for your useful advices, I just found this blog entry seraching on Google and I have a question for you, have u ever tried doing the laser print transfer with a color pattern? I tried and I had nearly zero issues with the proccess, it looked beautiful and detailed on raw claw but when I baked the pieces the colors changed a lot, green turned blue for example, do you know if there’s a way t fix this? I apprediate your kind reply in advance, thank you so much (:
LikeLike
I’ve had that happen, too. I’m not sure what do to about it. It’s frustrating.
LikeLike
Thanks for such an informative document on transferring images. I’ve tried out one method using Canon photo paper and wasn’t very success. The image transferred but looked faint and light in color. I was at JoAnn today and they have an ink jet transfer paper for light t-shirts by June Taylor company. I was just wondering if you had tried that brand. I have an 50% off coupon and thought I might try your technique, if you haven’t.
LikeLike
Thanks, Barbara. I’ve only used Avery brand transfer paper, so I don’t know how June Taylor brand would work.
LikeLike
On the Avery direct transfer, what were the actual steps. Did you peel it from the backing? Did you use water? I put it straight down with and left it for two hours and it didn’t do ANYTHING.. 😭
LikeLike
If you’re talking about the DIRECT TRANSFER METHOD of AVERY LIGHT FABRIC TRANSFERS PAPER #3275 (T-shirt paper): To make a transfer, I placed the printed image face down on the raw clay and gently rubbed it to remove any air bubbles and make good contact. Then I left it for an hour. You can leave it as long as overnight. Some parts didn’t transfer after an hour, so I rubbed them some more and tried removing the film from different directions. No water involved. You don’t peel away the backing until the transfer is done and you tell that by peeking under a corner. My guess is that you need to do more rubbing. Rubbing it down is key.
LikeLike
Great article. I tried the Avery paper recently but found that the film comes away from the backing onto the clay and it is too thick to cut. It also peels off the unbaked clay leaving no co.our on the clay. Does the raw polymer clay affect the transfer film somehow, if you leave it long enough?
LikeLike
The Avery paper does have a carrier film. I don’t think the carrier film will ever dissolve or actually transfer to the clay itself so the film can be removed. I haven’t left it for hours to see, but that’s not really how it’s designed to work. The film can be cut with an Xacto blade, but probably not with a cutter. You’d be better off with using Domtar First Choice Copy Paper or
Magic Transfer Paper if the film isn’t working for you. Baking parchment paper and Lazertran Silk are a couple other methods that I’ve been liking recently.
LikeLike
Wow Phyllis! As always, I really appreciate the value of your posts! 🙂 Marilyn L.
LikeLike
Thanks, Marilyn!
LikeLike
Hi, DIRECT TRANSFER METHOD of AVERY LIGHT FABRIC TRANSFERS PAPER #3275 (T-shirt paper) did you put a layer of liquid clay too? or just on a good soft clay?
LikeLike
No liquid clay. Just directly on clay. I don’t like using soft clay if I don’t have to. I generally use more of a medium to hard clay.
LikeLike