


I wanted to make a cuff bracelet from polymer clay that fit well. I wanted one that I didn’t have to worry about falling off, one where the gap stayed on the bottom instead of rotating to the top, and one without a safety chain or hook.
I started by buying an oval bracelet mandrel thinking that they’d worked out all the issues and all I had to do was form my polymer around it, bake it, and voila! It had small, medium, large and extra large sizes. I thought I was set.
I knew Kato was the clay to use for the bracelet core because it’s strong and doesn’t flex a lot when it’s thick. I extruded a polymer bracelet core from scrap Kato polymer clay using a disc for the Lucy Czextruder.

The mandrel arrived covered in that smelly oil to prevent rust. I cleaned off as much of it as I could then wrapped my my extruded bracelet core around the 2-1/2″ diameter size, which is supposed to be a medium. I have a medium-sized, 6-1/2″ circumference wrist measured around the area between my wrist bones and hand. When I baked it the garage reeked like old french fry grease.
The resulting bracelet was HUGE. The gap kept rotating around to the top of my wrist and the bracelet kept coming off. Totally unacceptable.


My next step was to make copper forms using the steel bracelet mandrel so I could bake without the smell. I made a small and medium form and soldered the seams. I decided a layer of clay inside the bracelet would make up for the gain in size from using the copper form instead of the mandrel itself.

For my next attempt, I used the small 2-1/4″ diameter copper form, since the 2-1/2″ medium diameter mandrel form was too big.
I also decided that the gap was rotating to the top of my wrist because that side of the bracelet was lighter since it had a big chunk of polymer missing from it. I thought I could solve that problem by making the gap smaller and putting weights next to the ends. I drilled holes and embedded seven metal beebees in each end of the polymer bracelet core.

Neither of these ideas worked. My body heat was warming up the polymer, making it flexible. The diameter of the bracelet was getting bigger and the gap was widening.

I read that Donna Kato puts heavy gauge wire inside her bracelets to prevent them from loosening when they get warm. I figured if that’s what she has to do with Kato clay, the firmest of clays, that it’s necessary.
I had the brilliant idea that I’d put memory wire inside, as though one little strand of memory wire was going to make a difference. That didn’t work either. Sometimes I don’t know what I’m thinking.


Not giving up yet, I did some Internet research and found David Smallcombe’s YouTube video on how to make cuff bracelets that fit well. He’s been making and selling metal cuff bracelets for 35 years. In his video he shows how they should fit and how to slide them on and off from the narrow thumb-side of your wrist.
I also watched a review of his bracelets where the young woman in the YouTube video said she wore hers constantly, to sleep, bathe, etc. Now THAT’s what I wanted.
David Smallcombe also has this very helpful bracelet-sizing chart and further fitting instructions on his website.

Clearly I needed much more substantial metal than memory wire inside the bracelet, so I watched Lizz Barnes’ YouTube video on how to bend aluminum blanks. I bought two lengths of aluminum blanks in three different gauges (12, 14 and 18) and three different widths (1/8″, 1/4″ and 3/8″) from TomlinandRoberts on Etsy.
ImpressArt also sells aluminum blanks in various widths, but the only lengths available seem to be 6″ and 7″. I’ve seen some of their blanks for sale at Michaels and on Amazon. ImpressArts also offers a bracelet bending bar in one diameter, which I’m not sure is enough for making small through large sizes.
I found the 14 gauge, 1/8″ thick, 5-1/2″ long aluminum blank from Tomlin and Roberts worked the best for the medium-sized bracelet I made. Twelve gauge was very difficult for me to bend and 18 gauge was too flimsy.
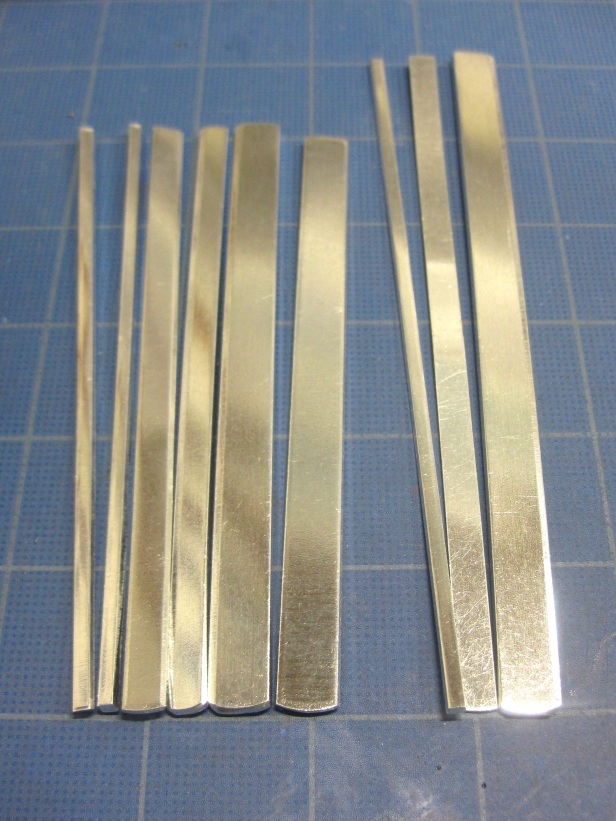
If the aluminum blank is too long, it can be cut with a jeweler’s saw and the raw ends ground or filed smooth. In the photo below I’m trimming down a 6″ long ImpressArt aluminum blank.

I also bought Double Cylinder Bracelet Shaping Pliers in two sizes. I believe only the larger one will be necessary unless making very small bracelets. There are other types of bracelet bending pliers available, but these EuroTool pliers do a good job.

I measured the width and thickness of my wrist, made a drawing of it and then drew a pattern of how I thought an aluminum blank would best fit it. I allowed about a 1-1/8″ gap for it to slip onto my wrist. I think I can easily modify this pattern for smaller and larger sizes.
I had the pre-conceived idea that wrists are oval-shaped. They’re not. They’re fairly flat on top and the thumb-side of the wrist is thinner than the pinky-side, which is fairly meaty.
It was easy to bend the 14 gauge aluminum blank to match my drawing. For my medium-sized wrist, the 1-3/8″ diameter cylinder pliers worked well. I used the 1-5/8″ cylinder on the same pliers to add a gentle curve to the area in the middle so it wasn’t totally flat.

I modified my Lucy Czextruder disc by super-gluing a small strip of the aluminum blank to one side of it so a channel would be created for the aluminum to fit into. Super glue isn’t a long-term solution, but it worked. The clay pushing against it helped hold it in place. I’ll make a custom disc to fit behind the Lucy disc.
The Lucy disc with super glued piece of aluminum came apart, so I cut out an extruder disc from a piece of galvanized steel using a jeweler’s saw.


Below is the extruded bracelet core with the aluminum blank in place. After it was baked, I super-glued the aluminum blank in place because it kept falling out, which was just annoying. Notice how the clay core shrunk leaving the aluminum blank sticking out a little. From now on, I’ll make the extruded clay core longer to allow for shrinkage.

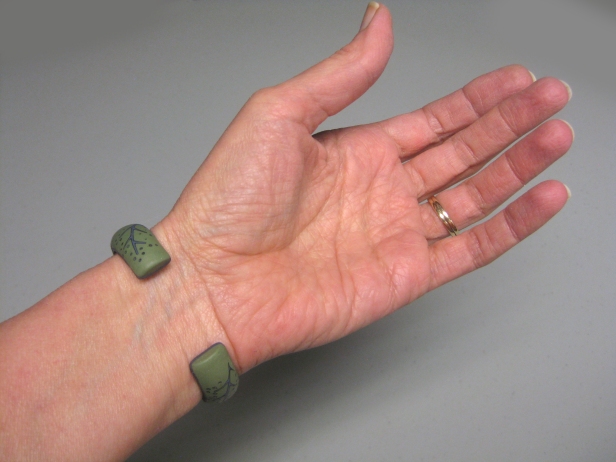
Below is a view of the four bracelets I made with the worst fit on the far left and the best fit on the far right. Notice how they got smaller and how the shape changed.

The photo below shows the third bracelet with the aluminum blank bent to the shape that I drew. It’s so much smaller!

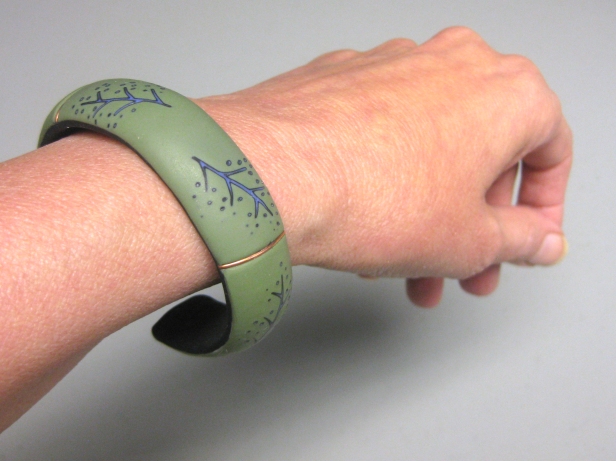
I covered the outside of the extruded polymer core with my veneers and covered the inside with a strip of polymer to hide and secure the aluminum blank. (The copper wires on the outside are for decoration only and serve no structural purpose.)

It fits well! I’m very pleased.
The bracelet is solid, but can still be bent slightly to fine-tune the fit. Once it fits, it should never need to be bent again. To bend it, I put my fingers on the inside, just in case the aluminum blank gets the idea it wants to break through the polymer.
I don’t think about this bracelet falling off. In fact, I barely think about it at all, which is the way jewelry should be. I don’t like to constantly fuss with jewelry I’m wearing.
The gap doesn’t rotate up to the top of my wrist. It hardly rotates at all, yet it’s not so tight that my skin sweats underneath it. It slides easily over my wrist bones. It doesn’t hurt to slide it on and off, like some bracelets do. I can remove my sweater without the bracelet coming off in my sleeve. I’m not going to sleep with it on, but, yay! Success at last!

Hello Phyllis, I need to change my email address from this one but can’t work out how to do that! Are you able to help, please?
Cheryl.
LikeLike
I think if you go to WordPress.com and click on your photo in the upper right hand corner, then choose account settings you can change your email address there. At least that’s how it works for me.
LikeLike
Thank you SO much for this wonderfully helpful guide. I’ve struggled to make a perfectly fit bracelet and got so tired of wasting money on unhelpful molds and the like that I put polymer clay down and haven’t picked it up since. Your tutorial is really helpful and I’m inspired to try again! Thanks so much 🙂
LikeLike
I’m so glad! I was beginning to think bracelets weren’t for me, but I’m glad I persisted.
LikeLike
Way to go!
LikeLike
Thanks, Holly!
LikeLike
Great post! I am thinking of making some raku bracelets out of clay, and some of these lessons you learned the hard way should help me!
LikeLike
Thanks! Raku would make a very interesting bracelet.
LikeLiked by 1 person
Yes! I have a few styles in mind that I am hoping to prototype 😉
LikeLike
Great article! I have a box of bracelet failures as well. I look back at them and wonder where my brain was when making them. I tried blanks as well. I have friends with vastly different wrist sizes, which caused problems.
I love your veneers. Are they a combination of silk screen and monuments gane? They are wonderful. ❤️
LikeLike
Thanks! I learned how to make the veneers in Dan Cormier’s single slice mokumé gané online class. No silkscreening involved.
LikeLike
Thank you so much! Now if I only had the jewellers tools! You are inspiring!
LikeLike
Thanks, Sandi!
LikeLike