
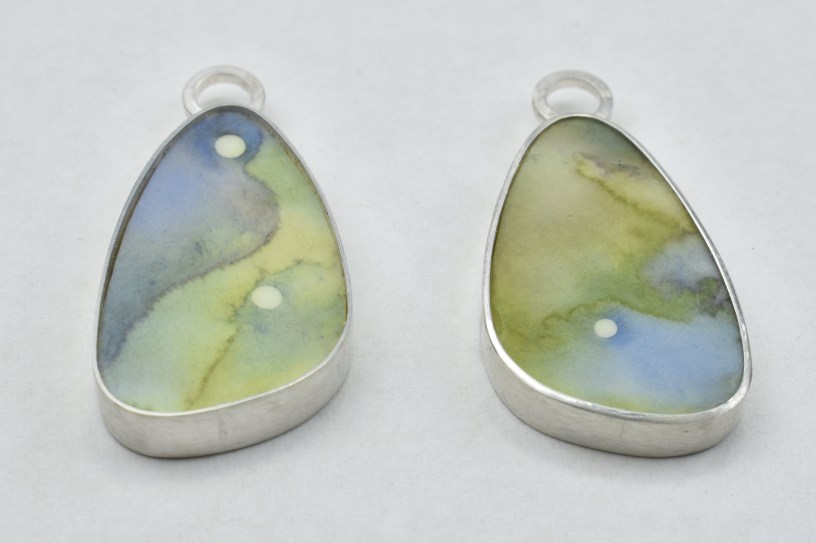

I wanted to learn how to make a closed-back bezel that was burnished over my polymer cabochons. It just seems more finished. I’d never made one like that to hold either a stone or polymer.
What I usually make looks like the bezel on the left, except the cab is flush with the top edge of the metal. I don’t burnish over the top edge and I leave it open-backed. I solder a couple wires through the opening to sandwich with polymer. It’s clean and simple.
You see burnished metal edges all the time with stones, but not very often with polymer. I didn’t know if polymer would be firm enough to withstand the pressure of pushing or hammering against it.
The other thing that concerned me is that often jewelers sand the bezels and tidy up the inside edges with gravers. I couldn’t use a graver next to polymer without scratching it. I was also a bit nervous about whether I could sand the metal without sanding off the finish I’d put on the polymer.
What I wanted to achieve was:
- A fine, even width of silver rounded over the top of the flat cabochon
- A perfect inside edge on the metal
- An even height of silver on the sides
- Sides that remained straight and upright. No bowing out
- No dents or bumps in the metal
- No damage to the polymer cab
Which bezel wire?
I didn’t know which bezel wire would be best. Jewelers have their own preferences for setting stones. All I could learn about setting softer materials, like polymer, was to use a thinner gauge fine silver.

To learn which worked best for polymer, I bought 6 different bezel wires to test: fine silver in 24, 26, and 28 gauge and sterling silver in 26, 28, and 30 gauge.
I wasn’t sure how much pressure the polymer could take, so I decided to use thinner gauges. Fine silver is much softer than sterling silver, so I thought I’d try even thinner gauges for the sterling.
The process

First, I cut the various bezel wires to approximately the right length, scribed what they were into the inside of each and annealed them so they’d be easy to form.

I made one plain white cabochon out of polymer (in the background of the photo above) and formed the bezel wires around it. I was able to easily form the fine silver around the cab using just my fingers. The sterling I could sort of form with my fingers, but it would spring open, so I had to use pliers to finish forming it.
Then I soldered the seams. Getting the ends to meet perfectly on 30 gauge wire was a struggle. It’s easier with heavier gauges.
I had to reshape all the fine silver bezels after soldering because they didn’t retain their shape. I didn’t have to do that with the sterling bezels.

Next, I soldered the bezels to back plates, sawed off the excess metal, sanded the edges and added jump rings.

Each was labeled so I could keep notes on how they worked for me.
Then, I cut out cabs from my baked watercolor veneers. I added a layer of clay to make them thick enough. The cab should be exactly the same distance down from the top of the bezel wire so there’s both enough metal and an equal amount all around to push over.
When cutting out my cabs, I used my white cab as a template. This was a bad idea because it wasn’t nearly as precise as it needed to be. Even though I checked that my white cab fit well into each bezel before I soldered it to the back plate, none of the bezels or cabs were exactly the same.
In fact, they were so far off, I had to make all new cabs. I carefully trimmed the new batch to fit each individual bezel, placing a length of dental floss behind them so I could pop them out and refine them until they were right. If I were using raw clay, I could just form them to the bezel, bake them in place and they’d fit perfectly, but my veneers were already baked.

You can see a couple places in the photo above where they still don’t quite fill the bezel. Spaces between the bezel wire and the cab can cause problems because you have to burnish or hammer the bezel in to fill the gaps and this can distort the sides.
I lightly sanded the top edge of each bezel on a flat surface to remove any imperfections.
Since I was a bit nervous about burnishing over the edges, I eased into it by doing the fine silver ones first by hand using just a burnishing tool.
I don’t know if it would have been easier if had I made domed cabs instead of flat.
Results

- Final burnished or hammered bezels. Left to right, top row: 26, 28 & 30 gauge sterling silver. Bottom row: 24, 26 & 28 gauge fine silver.
The sides of the 28 gauge fine silver bowed out when I burnished it. The metal wasn’t thick enough to remain straight when I pushed on the top edge. This is looks pretty bad, especially because it didn’t bow out evenly. Instead, it had dents here and there that I did my best to sand out.
The sides of the 24 and 26 gauge fine silver didn’t bow. With some effort, I was able to burnish them over by hand with a curved burnishing tool.
Hammering with the Foredom hammer handpiece
I tried burnishing the 30 gauge sterling by hand, but after a certain point it became too work-hardened and wouldn’t move. The sides also bellied out.
I then used my Foredom hammer handpiece on it and made a bumpy mess. I had previously rounded off all sharp corners on the bezel rocker anvil and polished it very smooth, so that wasn’t the problem. I just didn’t have much control over the hammering. I was able to sand the bezel with emery paper taped to paint sticks without touching the polymer, so that worry was unfounded.
Before hammering the two heavier gauges of sterling, I bought a speed controller for my hammer handpiece. This allows it to tap at a consistent, low speed. I was relieved when the 26 gauge sterling hammered wonderfully. Unfortunately, the 28 gauge bowed out when hammered.
The speed controller helped so much. After I first hammered the corners and a couple little area on each side, it enable me to move slowly around the bezel with an even tapping. I just wasn’t able to control the speed well with the foot pedal.
I also adjusted the strike on the hammer handpiece to the softest possible. It took more time to finish the work, but it didn’t make dents.
I was having problems with the thick cable running to the handpiece pressing the handpiece against my index finger. This hurt after awhile. To resolve this, I hiked the motor up higher so I didn’t have to fight against the cable to hold the handpiece naturally and comfortably.

Conclusion
I learned a lot from my mistakes during this test. The results weren’t horrible, considering it was my first experience.
Baked polymer is pretty tough stuff and I didn’t have a problem hammering on it. I used Cernit brand. A brand that’s more prone to breaking, like Sculpey III, could be a problem.
I learned that the inside edge has to be perfect because it’s difficult fix it without harming the polymer. I accidentally made some bumps that I can’t seem to fix. I tried the tip of the burnisher, but it marks the polymer. Maybe a thin piece of paper or tape would protect it. Of course, the best solution is to not make bumps.
The 26 gauge sterling was the easiest to work with. Hammering it turned out so well that I didn’t have to sand it.
The 24 and 26 gauge fine silver also worked well, but fine silver dents and scratches more easily than sterling.
I would not use 28 or 30 gauge of either metal. It’s too thin and the sides bow out when you apply pressure to the top edge. They can be sanded to sort of fix the mistakes, but it seems easier to just use a thicker metal that has more strength.
It’s important that the cabs fit as perfectly as possible. If they don’t, you end up burnishing or hammering the bezel in to fill the gaps and this can distort the sides.
I’d like to try 22 and 24 gauge sterling and fine silver, too. I’d also like to try the hammer handpiece on fine silver instead of hand burnishing.

Beautiful work Phyllis. Thank you for such a great, and in depth, article. I want to make silver mounts for some of my polymer pieces in the future. What did you use to solder the silver mounts?
LikeLike
I used a Smith Little Torch and hard silver sheet solder for the bezel seam and medium silver sheet solder to attach the bezel to the baseplate. I got the solder from Rio.
LikeLike
Thank you Phyllis for the detailed process you go into for setting polymer and the connections (hot and cold) you used. It was so helpful for me to see what you did and how it went. Now for me to try it…I am just finishing up some earrings in sterling and will try and get the entire pieces made, polished and ready to go…add the polymer and cure. We’ll see how that goes…loved the watercolor pieces you made.
Thank you,
Deborah
LikeLike
Thank you for your kind note, Deborah. I’m glad the blog post was helpful. It helped me to figure it out myself.
LikeLike
You did a great job with those bevels! And the completed piece is beautiful. May I ask, are the watercolour veneers done with actual watercolour paints or is it alcohol ink?
LikeLike
I used watercolor. I’ve found alcohol inks fade quickly, so I don’t use them.
LikeLike
Beautiful results. I love the combination of polymer clay and metals and often use wire but haven’t the courage to tackle silver. Its your perseverance and attention to detail that makes a great artist. Thank you for sharing. It would be great to see the tools and steps you use in working with silver but perhaps you are saving this for a workshop?
LikeLike
Thanks, Jan. Basic silversmithing can be done fairly simply with a minimal amount of tools. I started with Kate Ferrant Richbourg’s book called Simple Soldering. I’ve since gone on to other books and methods. It can get quite involved and you can spend a lot of money on tools and equipment. I could teach it, but I wonder if it’s too far afield for most people who use polymer clay. There are also more qualified metalsmiths than me, though most don’t combine it with polymer. I don’t know. You’ve given me something to think about.
LikeLike
I don’t know if you used a pusher or a rocker at all but when you are pushing the bezel over the “stone” a rocker is the best tool for me.
I wouldn’t bother with the burnisher. And if you are I find that an agate one is a bit less harsh.
Also I find that using thicker sterling bezel wire then filing down an edge to push over gives good results as thicker gauge wire plus the toughness of sterling is much harder to damage. Although I love how easy it is to use the thin fine silver bezel strip.
I’d stay away from the hammer at all costs as it will cause dents and it will stretch the metal.
Iv never set polymer clay but I have worked a lot with soft stones.
LikeLike
Thanks for the good advice, Paul!
LikeLike