


Often the templates available for sale are made of translucent colored plastic. I like to make my own shapes, so I decided to make my own templates out of translucent polymer clay. I’d been making them out of card stock, but the edges fray with use and the shapes become rounded and larger. Polymer clay is more durable. I also wanted to see through to the clay underneath the template to choose the best place to cut.
I start with a sheet of Pardo translucent clay the thickness of card stock. Cernit translucent would also work well. My experience with other brands of translucent clay has been that they plaque or turn yellow, but if it’s sheeted really thin, it might not matter.
I lay the sheet of clay on card stock so it’s all ready to bake because I don’t want to move it again and possibly distort the clay and the transfer I’m about to make onto it.

Next, I transfer my drawing onto the clay. In this case, it’s a simple petal shape that I drew on the computer and printed on my laser printer. It must be printed with a laser printer or laser copier, or it won’t transfer. Ink jet printouts won’t work.
If your shape isn’t symmetrical, you can flip it over to make a mirror image before printing it out.
I place the printout upside down on the clay so the toner is in direct contact with the clay. Then I spray the back of the paper with a fine mist of water from an atomizer or a Ranger Mini Mister. I press the water into the paper with my fingertips until all air bubbles and white spots are gone, the paper is uniformly damp and translucent so the image clearly shows through the paper. The goal is to make a really good contact between the toner and the clay.
If there’s not enough water, I spray it again, but I avoid getting it soaking wet. If it gets too wet, I squeegee off the excess water with my fingers or dab it off with a paper towel. Just as air bubbles can prevent a good transfer, too much water seems to interfere with a good contact between the toner and the clay.
Then I pull off the paper. No waiting, no rubbing off the paper, no excess fibers to remove, no alcohol. It’s fast and works like charm. If you wait, the paper will dry and you’ll have to rub off fibers sticking to the clay.
When transferring a larger image, I hold my printout up in the air, spray the back with water and wait a minute for the water to be absorbed before I lay it down on the clay. Larger pieces of paper buckle when they’re sprayed which makes it difficult to get the paper to lie flat for a nice transfer. Pre-wetting prevents buckling.
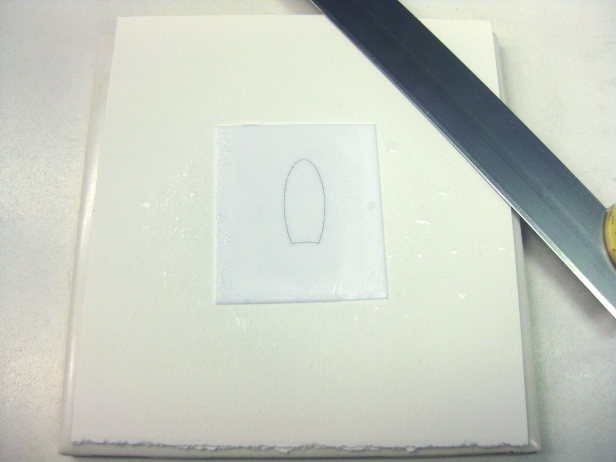
Then I bake the clay according to the manufacturer’s instructions. When it’s cool, I cut out my shape with a sharp #11 Xacto blade.

The template can now be placed over a veneer to choose the best area to cut.
To cut out the clay, I stick the veneer (or cane slice, in this example) to the glass. The template will gently stick to the clay, but I hold it securely with my fingers to make sure it doesn’t slip. The point of a sharp #11 Xacto blade works well to cut the clay or a very thin, sharp sewing needle embedded into polymer clay.
If you get bits of raw clay on your template while using it, clean it off or it could pull off parts of your veneer.

Thank you for this great idea Phyllis. I’ve done similar with ordinary opaque clay to make a window ‘frame’, but translucent clay would be much better for creating positive and negative selections.
LikeLike
Thanks, Jo!
LikeLike
I have just used plastic quilter’s template material, which is about as clear, to make templates. I also keep the cutout so I can position with the outside and cut around the inside. What do you think makes clay a better choice?
LikeLike
I use the cutout, too. I like clay because I can transfer my drawing to it easily, but whatever works!
LikeLike
Gillian what do you use to cut out your templates? I have tried making my own templates but they are never smooth or even on both sides
LikeLike
I just use a sharpcraft knife. Practice never lifting the knife as you turn your plastic.
LikeLike
Thanks Phyllis! Great idea. Love your blog. ❤️
LikeLike
Thanks, Laura!
LikeLike
This is so cool Phyllis. I have struggled trying to make my own templates out of plastic which does not work out very well! I never thought of polymer clay. Thank you for giving your knowledge so freely.
LikeLike
Thanks for your kind note!
LikeLike
Great idea. Merry Christmas to you and your family!
LikeLike
Thank you! Merry Christmas!
LikeLike
Phyllis, you are a genius and I love your blog. I visited while back and then lost my way so to speak but having “met” you again via Ginger I have found you again. Thank you for your generosity and wisdom.
LikeLike
Thank you for your kind words, Wendy. I’m glad you found me again!
LikeLike
Brilliant, Phyllis! Love this process. Do you ever do multiple images on one sheet, or it is just onesies?
LikeLike
Yes, sometimes I do multiple images. I’ve since purchased a Cricut Maker, so now I use it to cut stencils out of plastic stencil material.
LikeLike
Do you mind telling me what material you use cut on the cricut? I’m presuming you use the deep cut blade?
Thanks so much for all the work you do on this blog.
Hazel xx
LikeLike
Oops! My previous response was for polymer clay. For plastic stencil material I use Balsa 1/16”. Still 4X but 200 pressure instead of 300.
LikeLike