

I read about and tested several things to make removable cores for hollow beads. I wanted something that didn’t have to dry in a mold, like sugar and water, because I needed many of them. I found methyl cellulose mixed with very fine sand gave me the best results.
WHAT DIDN’T WORK WELL
I tried cornstarch, coarse sawdust, fine sawdust, toilet paper, coarse sand, fine sand, regular sugar, extra fine sugar and salt, all held together with methyl cellulose. The salt bead core looked like it was going to work, but it disintegrated when I applied slight pressure to it. The cornstarch cracked when it dried. The sugar didn’t hold together well. The rest were too lumpy and bumpy.
WHAT DID WORK WELL
Methyl cellulose is a reversible glue. Reversible is the key word because you can apply water to dried methyl cellulose and it will become liquid again. It’s ideal for making hollow beads because it allows you to wash away the bead core. It’s non-toxic and actually edible. It’s used in molecular gastronomy, as a common food additive, as a laxative, as a glue for archival-quality paper repairs and as a size for marbling paper among other things.
It comes in a powder that you mix with water to make a slimy gel. A small amount of powder goes a long way. I mixed some according to the instructions on the jar and put it in a glass baby food jar for storage and it’s remained liquid for months.
I was looking for something to mix with it that would dissolve in water, remain smooth and not crack when dried. Sand doesn’t dissolve in water, but it’s been used throughout history to make molds. I bought some fine beach sand. Craft sand may work, too. It needs to be very fine or you can sift out any large bits.

JUST THE RIGHT MIXTURE
The trick in mixing sand and methyl cellulose is to get just the right proportion.
I suggest working over a baking pan or something to contain the mess so you don’t get sand all over your workspace.
I put a little pile of sand in a plastic baggie and start mixing in methyl cellulose bit by bit until the sand starts sticking together. I pinch it and roll it into a ball and if it falls apart, I add more methyl cellulose. If it’s too wet, I add more sand.
Bead cores made from sand that’s too wet and heavy will sag and fall off the bead needle. You’ll get to know what the right mixture feels like with practice. Once you’ve got the right consistency, it will mold beautifully.
You can store the sand/methyl cellulose mixture in a plastic baggie and it will remain useable for awhile. It will dry out in time, so just add more methyl cellulose until it becomes the right consistency.
MAKING MOLDS
My next step was to make beads the size and shape I wanted from polymer clay, bake them and make two-part silicone putty molds from them. I used the yellow Alumilite Amazing Mold Putty, but actually prefer the purple Environmental Technology Easymold Silicone.
I molded the bottom half, let it set up, dusted it with cornstarch and then molded the top half. I left the bead needle in the bead when I made the mold because it helps with consistent alignment.
You don’t have to make a mold. You can mold the sand/methyl cellulose mixture by hand, if that suits your project.
MOLDING THE SAND CORES
When molding, it seems important to get just the right amount of material to fill the mold, but not overfill it.
I took a pinch of the sand/methyl cellulose mixture that looked the right size, pressed it into the mold and ran the bead needle through it. I pressed the mold together and then removed excess mixture or added more to get just the right quantity. Then I rotated and pressed it in the mold 2-3 times. If there were any remaining seams or bumps, I removed them with an Xacto knife. Trying to reshape by hand just seems to make a mess of it.

DRYING THE CORES
You can air-dry the cores or put them in a 200˚F oven for about 10 minutes, if you’re in a hurry. Drying overnight is my preferred method. Thicker cores will need more oven time. When they’re dry, they’re very hard and smooth. You can still scrape off any unwanted bumps with an Xacto knife.
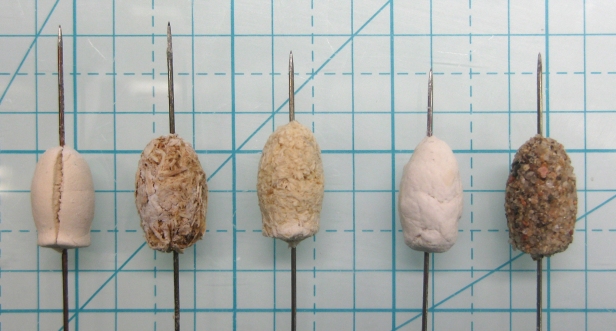
Below are some bead cores I made and dried in my improvised vertical baking rack.

ADDING VENEERS
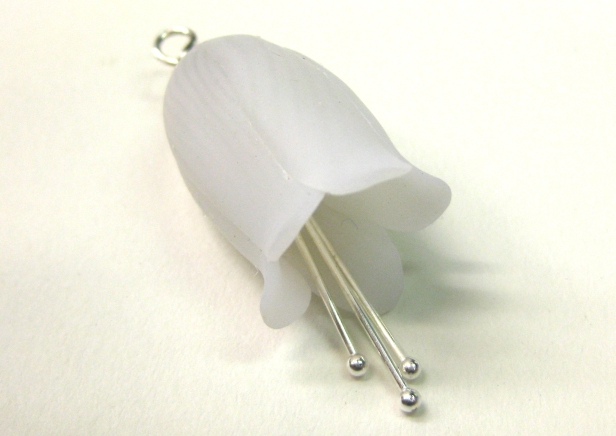
Next, press your polymer clay veneer around the cores, smooth any seams, cut large bead holes (3 – 4mm in diameter) using circular micro cutters and bake. You need to leave a fairly large hole in hollow beads to be able to clean out the bead core. In the example shown, the bottom was open, so a large bead hole wasn’t necessary.
REMOVING THE CORES
Put the baked beads in a container of cool water and the cores will quickly begin to melt.
Clean out the sand well using tiny bottle brushes, little teeth cleaning brushes, Q-tips, toothpicks or whatever you have on hand. I like to use a Japanese ear spoon. I also found a nice set of various sized bottle brushes on Amazon. I’ve found the beads need at least two cleanings with fresh water. Three cleanings is better to remove all the grit.
IMPORTANT: Don’t dump sand and water down the drain. It can clog the pipes. Instead, let the sand settle to the bottom of the container. Go outdoors and carefully pour off the water on top and let the sand dry out so you can reuse it. Also, don’t put bead needles in water. They rust. I learned that the hard way.

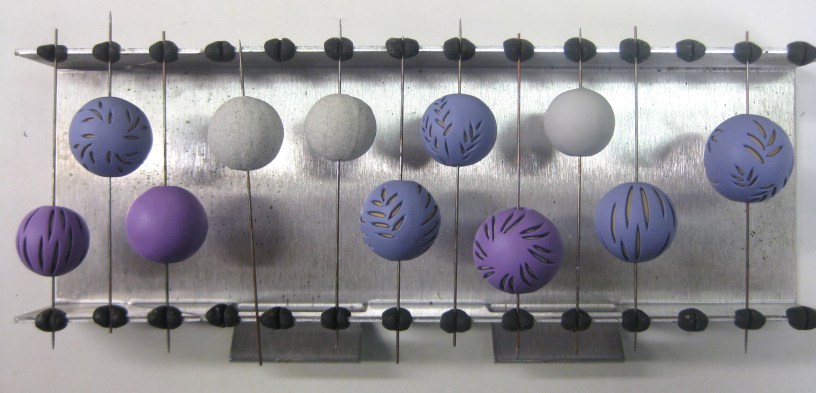
Other assorted bead cores and beads…


FILLING THE LARGE BEAD HOLE
If you don’t want that large of a hole in your bead, you can cover it with a bead cap or plug it with polymer clay after the bead has been baked and the sand bead core removed.
I cut a circle out of scrap clay the same size as the hole in the bead. Then I cut a larger circle from the exact same clay I used to make the bead veneer and put them together to make a little stopper. You can also just use your veneer clay for both parts.

With a toothpick, I put some Sculpey Bake and Bond around the hole in the baked bead and pressed the stopper in place. Kato PolyPaste or liquid clay will also work. I then let it sit for 10-15 minutes. That seems to give the raw clay, baked clay and liquid clay time to stick together better so the clay doesn’t slide around. Then I carefully trimmed off the excess on the top with an Xacto blade and smoothed it with my gloved finger to hide the seam and match the curve of the bead.
Next, I carefully twisted a bead needle through the stopper. Try to avoid pushing the stopper inside the bead. It’s a pain to fish out. Remove the bead needle. You need holes in the bead to allow the hot air inside to escape or your bead may explode.
Curing them is tricky. Because the bead is hollow, has no internal support and wants to collapse. I’ve tried baking them and using a heat gun. I prefer the heat gun because I can turn the bead with a tweezers and watch what’s happening. A vertical baking rack or a bed of baking soda works fairly well. In either case, heat for as short of time as possible, monitor them and be ready to restore the beads to their intended shape while they’re still warm.

This is fantastic! I def want to try it out…
LikeLike
Thanks, Gillian. It’s kind of messy, but it works well!
LikeLike
You cracked the nut! You did wonderful research, then shared it. I can’t thank you enough.
LikeLike
Thank you! I hope it’s helpful. It’s made my process much easier.
LikeLike
I’ve had an idea in my head for ages that I needed a hollow core like this to accomplish. Thanks so much for doing the hard work and sharing your results. This is what I love about our polymer clay community.
LikeLike
You’re welcome!
LikeLike
This is great information! And you’ve been so detailed about what works and what does not. AND kept us from rusting our bead needles! Thank you for sharing!
LikeLike
Thanks for writing, Debbie!
LikeLike