


I thought it would be nice to make my own bezels out of polymer to look like sterling silver. Little did I know how difficult that would be. I tested clays, powders, ink, pastes, paints, aluminum leaf and more on swatches of white Premo polymer clay.
PRODUCTS TESTED:
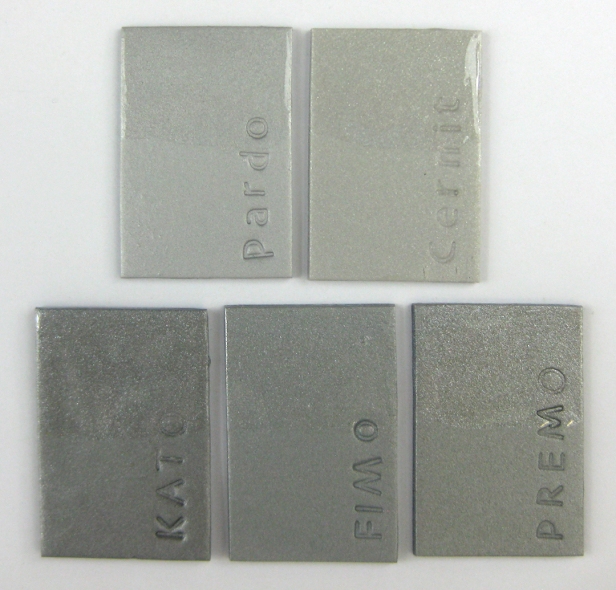
- Pardo Mica Clay, silver
- Cernit Glamour polymer clay, silver
- Kato Polyclay, silver
- Fimo Effect polymer clay, silver
- Premo Accents polymer clay, silver
- Alumilite metallic powder, silver
- Mehron Metallic Powders, metallic silver
- Graftobian Powdered Metal, silver
- PanPastel, pewter
- PearlEx, silver
- Perfect Pearls, pewter
- Ranger Adirondack Alcohol Ink Metallic Mixatives, silver
- Viva Precious Metal Colours, silver
- FolkArt Outdoor Acrylic Paint, Metallic Silver Sterling
- Swellegant Metal Coating, silver
- DecoArts Dazzling Metallics, Shimmering Silver Acrylic Paint
- Jacquard Lumiere Metallic Acrylic Paint, silver
- Resin mixed with Alumilite metallic powder, silver
- Baroque Art Gilders Paste, silver on baked and raw clay
- Rub’n Buff, silver
- Silver Leafing pen by Krylon
- Viva Inka Gold, platinum
- Aluminum leaf on baked clay adhered with Martha Stewart Gilding Adhesive, on raw clay, and on baked clay adhered with Translucent Liquid Sculpey
- DecoArts Extreme Sheen
- Liquid Leaf
Unless noted above, the powders were applied to raw clay and the paints, inks and pastes were applied to baked clay.
I’ll go into more detail on each product tested.
A SEALANT IS NECESSARY
A sealant is needed on all the surface treatments so they don’t wipe off or scratch off. A sealant also adds shine and enhances the reflectivity of mica powders.
I tried various brands of sealants on the powders. My results are at the bottom of this post. I chose to apply resin to the top half of the swatches.
As I learned, resin isn’t the best solution for all the surface treatments because it pulled away from the edges of some of the finishes, especially the paints and powders. I used UltraDome UV resin because on plain polymer clay it doesn’t pull away from the edges at all. It really was incompatible with DecoArts, Viva Precious Metal Colors and Swellegant, so much so that it didn’t dry on the edges.

SMOOTH AND SHINY
Real silver is smooth and shiny. It’s so shiny that you see reflections and extreme lights and darks more than the color of the metal.
Smooth and shiny first means that the clay needs to be smooth. Any bumps will be magnified by making them shiny. Had I realized this beforehand, I would have burnished the surface of the raw clay and tried harder to avoid air bubbles.
To me, brushstrokes, cracks, crinkles or obvious mica particles don’t make it look like real silver.
METALLIC POLYMER CLAYS
The mica particles in Pardo Mica Clay were much smaller than the other four brands of polymer clay. Premo had the most glitter-like look.
Pardo, Kato and Fimo were a neutral gray, meaning not warm or cold in color. Cernit and Premo were a little bit warmer greenish-gray. Kato was the darkest gray.

POWDERS
The very finest powders were Alumilite, Mehron, Graftobian. They seem virtually identical. They make a very shiny, smooth, aluminum-colored finish on raw clay, which impressed me. Alumilite powder is made to add to resin. Mehron and Graftobian are made to use on skin, like face paint.
PanPastel made a nice finish. Its particles weren’t quite as fine. The particles in PearlEx and Perfect Pearls were yet a tiny bit larger. PearlEx is a warmer color than the others, which are all neutral.
Perfect Pearls is pewter color instead of silver. Since Perfect Pearls and Pearl Ex are so similar, I decided to try a darker silver to see if it looked better.
When trying to rub these off after baking, PearlEx and Perfect Pearls remained on the clay better than the others. The finest powders rubbed off a lot. All the powders scratched off and need to be sealed.
The finest powders also had a tendency to move around when the sealant was applied. Disturbing the mica particles changes how they reflect the light, which is most evident in the top of the Graftobian sample in the photo below. The top three powders will all react in the same way. Rubbing off some of the powder with a soft cloth helps avoid this, or quickly and confidently applying the sealant and not working back into it.
The resin pulled back from the edges on all swatches below except Perfect Pearls, maybe because it contains some resin made it more compatible.


INKS & PAINTS
The problem I found with inks and paints is brushstrokes. Maybe there’s a way to avoid them by pouring or sponging the paint on.
The alcohol ink had no brushstrokes because I poured it on the swatch. However, when I moved it around with a brush on a bezel I made, the mica particles shifted and made darker areas.
Viva Precious Metal Colors covered well with only one coat. I had to give more coats of the other paints to get total coverage:
- Swellegant 2 coats
- DecoArts 2 coats
- FolkArt 3 coats
- Lumière 4 coats
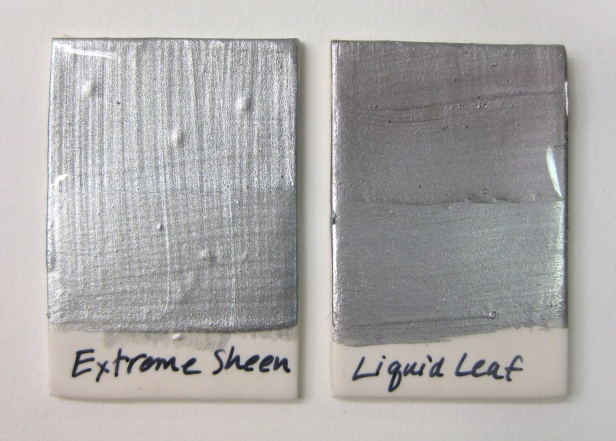
- DecoArts Extreme Sheen 3 coats
- Liquid Leaf 3 coats
All were a neutral color, except Lumière, which was warmer. All had very small particles, except Lumière’s which were larger.
After painting, I baked them all for 20 minutes at 250˚ to hopefully prevent the paint from scratching off. DecoArtsExtreme Sheen didn’t scratch off. Viva Precious Metal Colors and Lumière adhered better than the others, but they still all scratched off.
Liquid Leaf is spirit-based, which makes me worry it will become sticky. I tried some aged bronze Vintaj patina for metal and it got sticky. It is very shiny and mercury-looking in the bottle.

 ASSORTED MEDIA
The first swatch below is Alumilite powder mixed into resin. You have to tilt it at various angles while it’s wet to get the mica particles to sort of become uniform-looking before curing the resin. The particles of Alumilite in resin are much more obvious than when the powder is rubbed into raw clay.
Gilders Paste Wax I tried on both baked clay and raw clay and didn’t notice much of a difference. I applied two coats and buffed each. It would probably benefit from a third coat.
Rub’n Buff seems the same as Gilders Paste except it smells like solvent. The particles in Gilders Paste and Rub’n Buff were very fine.
The nib of the Krylon silver pen is scratchy and left streaks. I gave it two coats.
Inka Gold is platinum color, which is why it looks so different. I applied two coats and baked and buffed each. I had a hard time because it had rather dried out. I revived it with water, bit it was still a bit lumpy and grainy. If it were silver color and a brand new container, I’m sure it would look better. The particles in Inka Gold were about the size of those in Perfect Pearls.
Except for the resin, I baked them all for 20 minutes at 250˚ and they all scratched off easily.


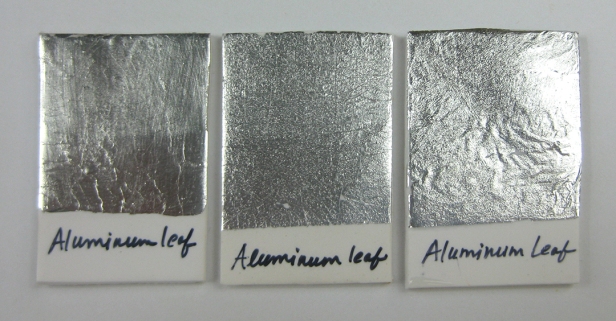
ALUMINUM LEAF
I tried adhering aluminum leaf in three different ways.
- The swatch on the left below was on baked clay adhered with Martha Stewart Gilding Adhesive. It had the smoothest surface, though it had cracks.
- The middle swatch was adhered to raw clay. It looked somewhat better before I moved it. It needs to be adhered and then not moved until it’s done baking.
- The swatch on the right was on baked clay adhered with Translucent Liquid Sculpey because I’d found it the past that it did a good job adhering leaf.
They all still scratch off easily. Sigh. The resin did adhere all the way to the very edges.
I use aluminum leaf because it looks virtually identical to silver leaf, except it doesn’t tarnish like silver. It’s also much cheaper. All were burnished with cotton balls after they were baked to smooth them and bring up the shine.
To me, aluminum leaf looks the most like real silver, except it was very difficult for me to get a smooth finish without cracks or bumps.
Silver craft foil is an option, but I’ve never used it and don’t think it would bend around a bezel.

SEALERS
I knew from past experience that sealing powders isn’t easy, so I chose to test them. I rubbed off quite a bit of powder from the three swatches in the bottom row before I applied the sealants. It made the silver darker. I didn’t rub off any powder from the three in the top row.
I tried every sealant that had tested fairly well in the past, plus some new ones I hadn’t tested previously.
I tested two sealants on each swatch. Here are the twelve sealants as labeled in the photo below:
- UltraDome UV resin
- Cernit Gloss Varnish
- Sculpey Clear Liquid Clay
- PearlEx Varnish
- Fimo Liquid Gel
- Kato Liquid Clay
- Sculpey Satin Glaze
- Golden Glazing Medium
- Americana Triple Thick Gloss Finish
- Varathane
- Fimo Gloss Varnish
- Final Coat — I gave it two coats
I cured them or let them dry for 24 hours. Then I tried to scratch them off. Most didn’t survive the test. Here are those that did:
- UltraDome UV resin
- Sculpey Clear Liquid Clay
- Fimo Liquid Gel
- Kato Liquid Clay
- Triple Thick Gloss Finish


CONCLUSION
So which is the best? Dare I say none? Frankly, if I’d found one I was totally happy with, I wouldn’t have kept buying more products to try.
If you’re really skilled in applying aluminum leaf, that’s the closest to the real thing. I’m not that skilled, yet.
Some of the rest look like a good, silver, metallic paint job, but none looked like real, shiny, chrome-like silver. I think you can create a nice antiqued silver, pewter, lead or aluminum with some of the products above. Personally, I’d rather not use anything that isn’t smooth or looks too much like glitter or smells like solvents.
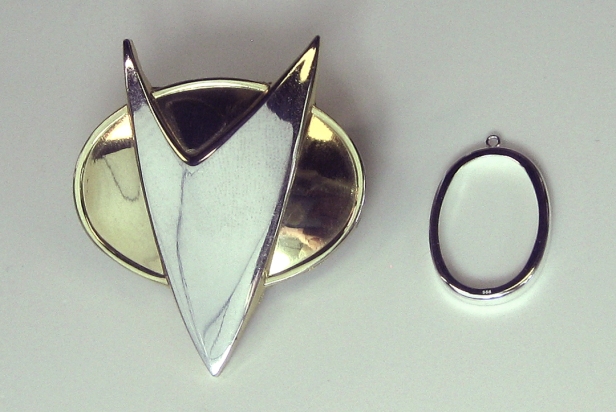
TEST BEZELS & BEADS
In the photo below are some bezels and disc beads I made. The open bezel on the right is real sterling silver. As you can see, none of them look like real silver, but they’re not bad.
The large bezel with my windmill photo is silver Pardo Mica Clay sealed with UltraDome UV resin slightly tinted with Alumilite black dye colorant.
The two oval bezels are covered with Alumilite powder. The one on the left is coated with plain UltraDome UV resin. The one on the right is coated with UltraDome UV resin slighted tinted with Alumilite black dye colorant. The disc beads are also Alumilite powder coated with clear resin.
The rectangular bezel is metallic alcohol ink coated with clear resin. I tried to pour the alcohol ink on, but ended up using a brush on the inside of the bezel. You can see where the mica shifted from the brushstrokes.
All bezels were made using Cabezel molds. I used a custom rubber stamp for the swirls.


OK, one last test: Ranger Embossing Powder, Liquid Platinum adhered with Versamark embossing liquid and sealed with UltraDome UV resin. There aren’t any brushstrokes or overly large mica particles. It raised up along the edges and created some tiny bubbles. The resin really pulled back from the edges. It’s a challenge to find a sealant and/or adhesive that works well with embossing powder. It scratches off so easily, which is probably why I didn’t include it previously.


Thanks for all the hard work you to do provide us with great information! You are much appreciated! Also thanks to Ginger of the Blue Bottle Tree for making me aware of your great posts.
LikeLike
Thanks, Chris and Ginger, too!
LikeLike
What an amazing and comprehensive body of tests. Thank you so much for your work and for sharing it. Thank you also to Ginger of Blue Bottle Tree for directing me to this post with her post.
LikeLike
Thanks, Barb and Ginger!
LikeLike
Hello Phyllis,
Thanks for such a great, informative article. I really appreciate you taking so much time investigating. I tend to use black clay as the base for my bezels when I want to create the look of faux silver. It never really gets the look of commercially produced metal jewelry but I’m OK with that. I will try using white next time to see the difference as you have me very curious now. (thanks as well for using the CaBezel molds in your example).
LikeLike
Thanks for writing, Wendy! I think a black base works very well, too, especially if there’s a texture. I tried using it instead of white and the powders totally obscured the base color, so I decided to stick with white for the test. I love your CaBezel molds!
LikeLike
There’s a new finger nail powder that turns nails into mirror. Maybe that would be of some help in your quest
LikeLike
Thanks, Lisa! I hadn’t heard of it. I ordered some from a shop on Etsy. It’s chromium powder instead of aluminum, so hopefully it will have a different look. https://www.etsy.com/listing/462897647/mirror-nail-chrome-powder-silver-chrome?ref=pla_similar_listing_top-5
LikeLike
I tried some chromium powder for nails and it was yellowish and had glitter in it. If you find a better brand, please let me know.
LikeLike
This is tremendously useful. I really appreciate the work that went into this very thorough testing. I had pretty much given up on faux silver, but I may try again.
LikeLike
Thanks, Rosina. I was impressed with the micro powders.
LikeLike
Thanks so much for all your great research. You did a great job, even though there isn’t the perfect product to produce a shiner, silver-like bezel. I appreciate the enormous amount of time and effort this project entailed.
LikeLike
Thanks, Laura!
LikeLike
i am a brand new newbie to polymer clay and am very interested in metallics. your article has saved me hours and hours of reseach time…..i am very appreciative of the detailed information you have provided. thank you thank thank you!!
LikeLike
You’re welcome!
LikeLike
oops! research time. =)
LikeLike
Thank you! Great & useful article!
LikeLike
Thanks, Alessio!
LikeLike
Very many thanks for your in-depth study, it must have cost a fortune. I wonder if mixing mica powder into some pc either liquid or transluscent and applying as a thin veneer would work? thanks again Phyllis xx
LikeLike
If you try it, please let me know how it goes. I know there’s a limit to how much powder you can add and still have the polymer clay stick together.
LikeLike
You could try molotow liquid chrome (either the pen or refill). I find it has the most mirror like reflective surface of any metallic (I’ve never used it on clay though, just in my mixed media art). Thanks for all the amazing research and effort put into this test, it’s really helpful!
LikeLike
Thanks for the suggestion!
LikeLike