

What do I mean by double-baking? It’s pre-baking at 200˚, cooling the clay completely and baking it a second time for only 10 minutes at the manufacturer’s recommended temperature.
The outside columns in the photo above are swatches of polymer clay from my other test which are full of plaques. It bothered me that I couldn’t get translucent Fimo and Kato to cure without plaquing, breaking and yellowing.
However, notice how the plaquing starts to disappear as you move down the inside two columns that were double-baked.
POLYMER CLAY AND COOKIE DOUGH
The plaques in these two brands of polymer clay seemed like gases expanding, rather than air bubbles, so I thought about cookies.
When you put cookies into a preheated oven, the baking soda expands and the cookies rise. If you put cookies into a cool oven to gradually warm up, they don’t rise as much because baking soda needs an immediate blast of heat to expand.
If you put thoroughly baked cookies back into the oven after they’ve cooled, they usually don’t rise any more. So, I thought that if clay is baked at a low temperature and it has no plaques, then it was cooled, maybe it would remain stable and plaque-free when baked again.
Well, polymer clay isn’t cookie dough, but I thought I’d try it.
TESTING
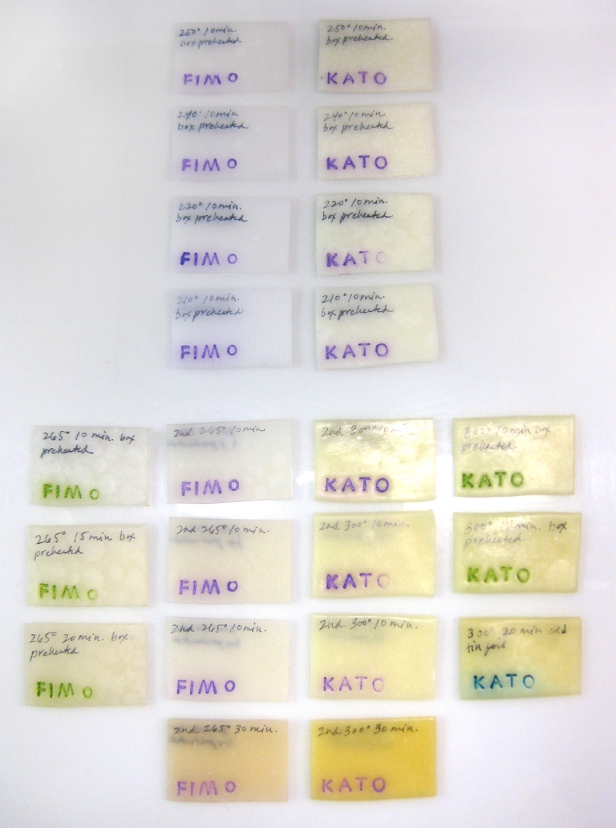
First, I had to learn the highest temperature at which plaquing didn’t occur. I started at 250˚ and went down. Plaquing stopped around 210˚ for Fimo and 200˚ for Kato. Neither clay shifted color at 200˚ to 250˚. See the top eight swatches in the photo below.
Next, I had to learn how long the clay needed to be pre-baked to remain stable and plaque-free.
Ten minutes of pre-baking wasn’t long enough for the gases to dissipate. When I pre-baked swatches of Fimo and Kato for 10 minutes at 200˚, cooled them and baked them a second time for 10 minutes at 265˚ and 300˚ respectively, plaques appeared.
Since ten minutes wasn’t enough, I tried an hour of pre-baking. When I cooled them and baked them a second time for 10 minutes at the higher temperatures, there weren’t any plaques in Fimo, but there were a couple in Kato.
I don’t really like to bake that long, so I tried again, this time pre-baking for 30 minutes at 200˚, cooling and then baking the swatches a second time for 10 minutes at the higher temperatures. There weren’t plaques in either brand!
This seemed like a wonderful thing, but I was concerned that baking the second time at higher temperatures for only 10 minutes wasn’t enough for the clay to be strong and not break.
So I pre-baked swatches for 30 minutes at 200˚, cooled them and baked them a second time for 30 minutes at the higher temperatures. There weren’t any plaques, but they turned color quite a bit. (See the very bottom row in the photo below.)

Of course, then I had to see if the clay broke, and it did.

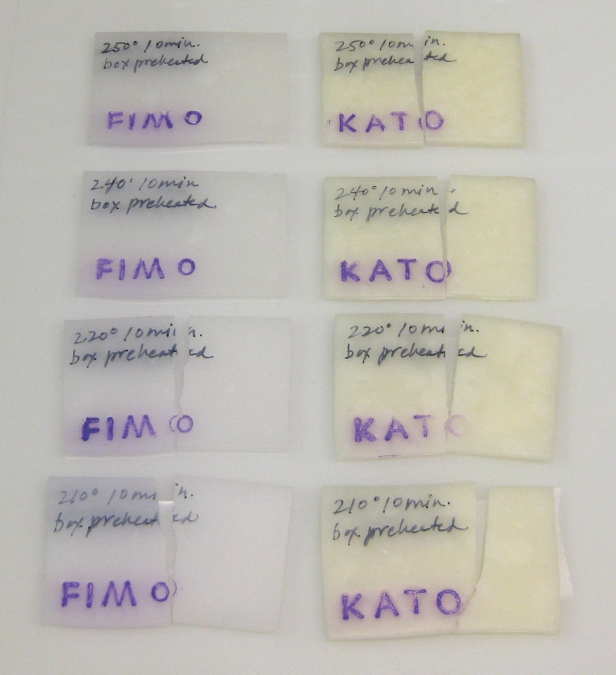
The pre-baked swatches in the photo above aren’t intended to be a final product, but it’s informative to see at what temperatures they break. Kato pre-baked for 10 minutes at 210˚ to 250˚ had plaques and broke very easily. Fimo had no plaques at 210˚ and 220˚but it broke. It didn’t break at 240˚ or 250˚, but unfortunately it had plaques.

In the photo above, the middle two columns were double-baked.
Kato was really difficult to bend and break. You can see the white stress marks near the breaks.
The top Kato swatch that broke was pre-baked for 10 minutes, cooled and baked a second time for 10 minutes at the recommended temperature of 300˚. It had several plaques.
The second Kato swatch that broke was pre-baked for an hour, cooled and baked a second time for 10 minutes at the recommended temperature of 300˚. It had a couple plaques.
Fimo was flexible and didn’t break.
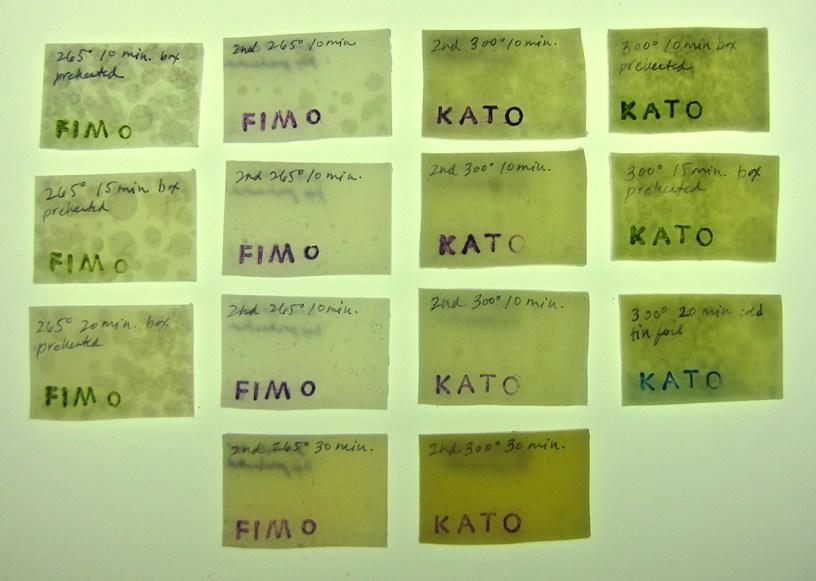
COLOR TEST SAMPLES

In the color test samples, the bottom row that was only baked once for 30 minutes at 300˚ had more plaquing than the top row, and the white and translucent got darker. The colors in both rows shifted an equal amount. Most noticeable shifts are the green and magenta.

The surface of the double-baked Kato isn’t perfect, but it has fewer bumps than the bottom row. The surface of the bottom row also has a shine. The plaques in the bottom row are most evident in the green.

With Fimo, the translucent really yellowed and plaqued when baked only once at 265˚ for 30 minutes. There are only some tiny bubbles in the double-baked translucent swatch, which remained whitish. The colors in both rows shifted when baked, most noticeably the green, ultramarine and purple. Those three colors, plus the white, darkened slightly more in the bottom row.
It’s hard to see in the closeup photo above, but the surface of the clay in the bottom row that was baked once for 30 minutes at 265˚ has a few small bumps. The surface of the double-baked Fimo in the top row is completely smooth.

With Premo, the translucent yellowed a tiny bit more when baked only once at 275˚ for 30 minutes. There aren’t any plaques in either row. The colors in both rows shifted equally when baked, most noticeably the green, ultramarine, purple and fuchsia.

In the closeup photo above, the surface of the clay in both rows is completely flat and smooth. I can’t see any big benefit from double-baking Premo, unless it breaks less, so I tested that.
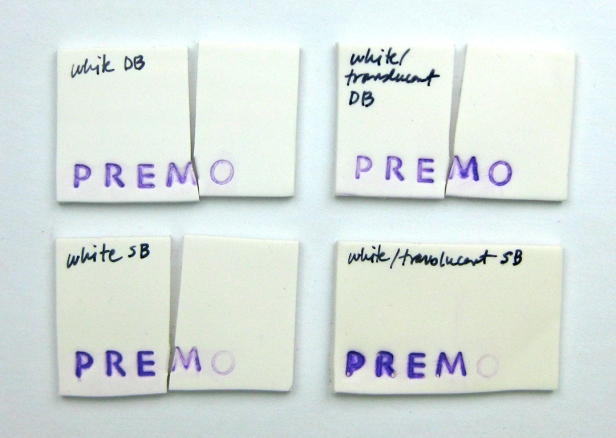
The above test seems to show that double-baking does not make Premo less likely to break. The swatch that didn’t break was half white and half white translucent Premo baked only once at 275˚ for 30 minutes. It yellowed a bit, but the translucent made it more flexible. I previously mixed half white and half white translucent Premo and it broke.

With Cernit, the translucent yellowed a bit when baked only once at 265˚ for 30 minutes. There aren’t any plaques in either row, but there are hundreds of tiny bubbles in both translucent white swatches. The colors in both rows shifted equally when baked, most noticeably the green, blue and violet.
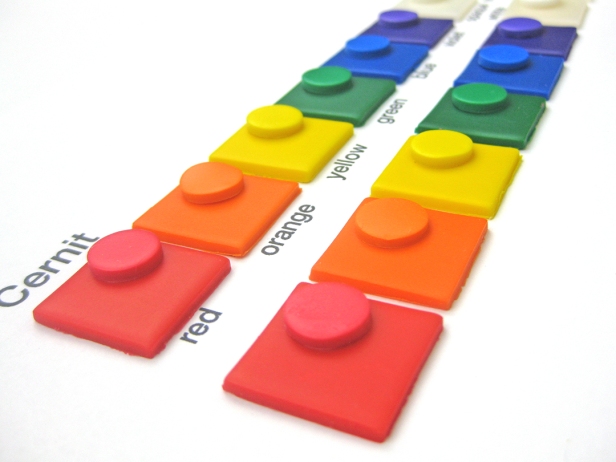
In the closeup photo above, the surface of the clay in both rows is completely flat and smooth. I can’t see any big benefit from double-baking Cernit.
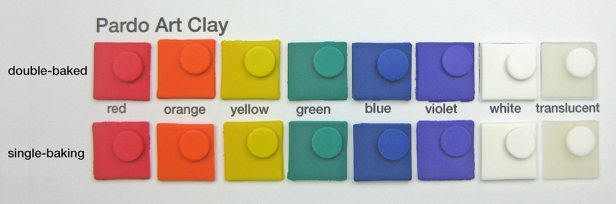
With Pardo Art Clay, the translucent has fewer tiny air bubbles when baked only once at 250˚ for 30 minutes. Its translucent is the clearest of all brands tested. There aren’t any plaques in either row. The green and yellow shifted a little when baked, but the rest of the colors didn’t shift, maybe because Pardo cures at the lowest temperature.
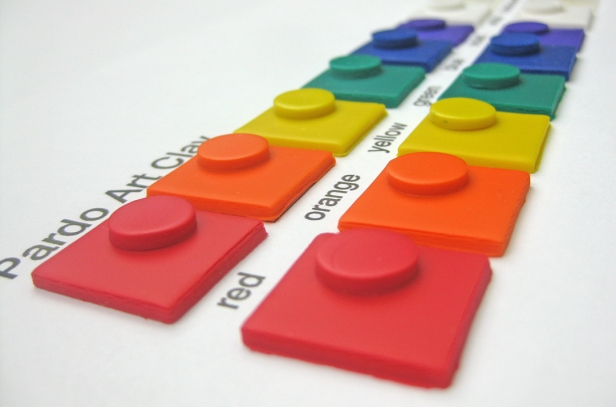
In the closeup photo above, the surface of the clay in both rows is flat and smooth with only a couple tiny bumps from air bubbles. I can’t see any benefit from double-baking Pardo.

Soufflé wins the prize for the least color shifting, whether double-baked or not. The white yellowed slightly when baked only once. Soufflé doesn’t offer a translucent clay. There was no plaquing in either row.

Soufflé has a unique surface quality. Its colors aren’t the traditional primaries and secondaries. They’re more subdued. The only small benefit from double-baking Soufflé is that the white remains a bit whiter.
CONCLUSION
This testing might sound complicated, but I’ll simplify it.
The best double-baking solution I’ve found for Kato and Fimo to avoid plaquing, breaking and a lot of color shifting is:
- Pre-bake polymer clay for 30 minutes at 200˚ in a preheated aluminum baking box.
- Cool clay completely.
- Bake clay again at manufacturer’s recommended higher temperatures for 10 minutes: 265˚ for Fimo and 300˚ for Kato.
A baking box is two cheap aluminum baking pans, one inverted as a lid with two small ceramic tiles inside.
Double-baking doesn’t seem to offer much of a benefit to Premo and Cernit, except to keep white and translucent a bit more white.
I’ll continue to try double-baking and report back.
Note: I live at 85oo feet which means I may need to increase temperatures and/or bake times. If you live at a lower elevation, the temperatures I’ve used may be too high for you.
P.S. I bought all these products myself and received nothing from the manufacturers.
UPDATE: 1-30-17 I just learned that double-baking is a simplified version of ramp baking, which has been used by doll makers and sculptors for a long time. It may have been developed by artist/author Katherine Dewey. It’s more complex and takes more time, but may work even better. Here are some links if you’d like to explore it further.
“If you want to prevent scorching and uneven color change, use a ramp up baking technique: Use an independent oven thermometer and a glass pan. Cover your work with a damp paper towel. Begin at a low temp, say 200-220 and every 10 minutes or so bring up the temp another 10 to 15 degrees. When the oven reaches manufacture recomended temp, the real curing and fusing of PVC and plasticiser begins. Bake at that temp, but subtract 1/4 to 1/3 the recommended baking time and let your sculpt cool in the oven at least as long as it baked. Your oven will hold that recomended heat for 10 to 20 minutes. Don’t open the door because you’ll loose the accumulated heat and defeat the purpose. To protect your oven, set that baking dish in a roasting bag or under a foil tent.” –Katherine Dewey http://pub18.bravenet.com/forum/static/show.php?usernum=1505510207&frmid=22&msgid=900136&cmd=show
“…I first bake for 15-20 minutes at 225, 15-20 minutes at 250, then depending on the thickness of the sculpt for between 20 and 60 minutes at 275.” –Sheryl http://www.noadi.net/tutorial/quick-tips/
“Starting at a low temperature of around 175-200° F bake for 30 minutes, increase the temperature by 15-30° and bake for 20 minutes, continue increasing the temperature by 15-30° and baking for 20 minutes after each increase until the temperature reaches the manufacturer recommended temperature. Bake at the recommended temperature for 30 minutes. Allow the piece to cool completely in the oven before moving.” –Tommy http://www.therpf.com/showthread.php?t=90598
“One puts the clay piece in a cold oven and cures at the lowest temperature for 20 minutes and then raises the temperature to 200 F for 20 minutes. Then, without opening the oven gradually increase the temperature 50 degrees every 10 minutes until the target temperature is reached and start timing of the actual curing time.” –Melody O’Beau http://melobeau.blogspot.com/2013/03/daffodil-spring-cat-and-eliminating.html
“Pre-heat the oven to 100c/212f bake for 30 minutes then remove. Ramp the temperature up to 110c/230f for 20 minutes and remove. Ramp up to 120c/248f and bake for 20 minute then remove. And finally ramp up to 130c/266f for 30 minutes and you’re done. Always wait until the oven is at the next temperature before the next bake. I have done this without removing between steps and it doesn’t really make a difference. But I like to take it out between steps to check on the piece. I also have a basin of cold water ready and dunk the piece between pieces. It seems to add strength and if you’re using liquid clay it changes the way it looks.” –Shawn G http://www.beadvideos.com/benefits/050-4-tips-baking/

I used Pardo for the first time today and my first few test cures (thin sheets) had round plaques. After I adjusted my conditioning technique (and followed Cindy Leetz’s advice not to smoosh the clay into a ball), the bubbles went away, so I think it was user error. I totally appreciate the tip for Fimo because I do use that brand from time to time.
LikeLike
There seems to be a difference between air bubbles introduced by conditioning and gas bubbles which are produced by Fimo and Kato when baked. So far, I haven’t seen gas bubbles in other brands.
LikeLike
Hi Ms. Phyllis,
Just stumbled across your website today and wanted to say how much I love it! I love the way it’s laid out and how it’s written – clean and clear! You just gained a new follower! Keep up the good work.
LikeLike
Thanks, Lynn! I appreciate it.
LikeLike
I find your experiments quite interesting. However, I can’t help but think that some of the plaquing you’re experiencing has to do with conditioning. I’ve been using Katoclay for about 15 years, the only time I even got close to that amount of plaquing was when I was inexperienced or I was careless with conditioning. I expect you might disagree with me, but I’m also kind of horrified at your double-bake method. With Kato at least, that method pretty much insures a weaker finished product. There are better ways to reduce plaquing in Kato (and that seem to work with Premo too). I use translucent more than any other color, so over the years have learned how to reduce/eliminate plaquing.
Some additional things to consider are age/freshness, softness/firmness, tenting, baking in a “bath”, etc.
LikeLike
Susan, please share your better ways to reduce plaquing! I don’t have your years of experience, but I do try to be scientific, thorough, open-minded and learn through testing.
I’ve had a couple other people express concern with this method. Breaking is a big concern for me, so I test for it. Whether there is long-term weakness from this method, I don’t know. Kato will break if not baked long enough at some point at 300˚F. I’ve been told this method is like ramp baking that doll makers have been using successfully for many years. I’ve read that Premo manufacturers say their clay is weakened if not baked at a high temperature from the beginning, though I’ve had problems with it breaking regardless.
This particular blog post was a spinoff of other tests where I used Kato, Fimo, Premo, Cernit and Pardo. In those tests, they were all conditioned thoroughly and not carelessly (I promise!) and baked according to manufacturers’ directions. In comparing them, it seemed clear that something was different with Kato and Fimo that caused plaquing. That led me to trial and error to try to get rid of it. As shown, the plaquing gradually went away when the clay was baked differently, so to me that points to something in their chemical composition.
All of the clays were purchased either shortly before the tests or within a year or so before, so they seemed on the fresh side. They were baked in a preheated baking box (two aluminum tins, one used as a lid, with two small ceramic tiles inside) based on other tests I’ve done.
LikeLike
Hi Phyllis,
Sorry to take so long to answer, didn’t see your reply for a while. I bake all brands (even Sculpey III) at 300 – 325 degrees F. I also over bake, that is for a longer (sometimes way longer) than the prescribed time. So my method probably acts on the clay in a similar manner as the ramping up method, but is faster and easier. I bake my pieces in a “bath,” but it’s not a water bath. It’s a baking soda bath. I use the disposable aluminum tins. In the bottom of the tin, I place 1/2 to 1-1/2 inches of baking soda. I then nestle my piece on that layer, pushing the baking soda up under any elevated parts, you don’t want any gaps. Then I pour more baking soda on top at an equivalent depth of the bottom layer. If space allows, I may place several pieces or parts in the tin. Lastly, I place a layer of foil over the top, I don’t try to seal it tightly to the tin though. I set the tin(s) on the metal tray that came with my oven, along with the thermometer. I place it in a preheated , calibrated oven. I rarely bake anything less than an hour, sometimes up to two hours, my pieces don’t generally have more than 1/4″ to 3/4″ clay depth, I use an armature if it needs to be thicker. I add 10 – 20 minutes (depends on baking soda depth) on top of the bake time to allow the contents of the tins to reach to reach the proper temperature. The baking soda can be used over and over again, I leave it in a large, covered tin when not in use. When I remove it from the oven, i set the tray on a metal rack and remove the foil. I let it cool for awhile until it’s a safe temperature for handling. At that point, I use a little pair of silicone-coated tongs to easily pick the pieces up. I rinse the finished pieces off under running water. In addition to eliminating/reducing plaquing, this method supports the piece, and allows me to bake without darkening. Unless I want to darken it in a controlled manner, but that’s another topic.
Oh, I should add that you probably want to wear a mask or something over your mouth and nose to avoid breathing in any baking soda when pouring. It might also work with cornstarch, but NOT with Kato, I learned that the hard way. Feel free to contact me with any questions you might have.
LikeLike
Thanks, Susan! I tried that method a while back with Fimo translucent and it worked like a charm. It was clear, no plaquing, no yellowing. I also tried it with Kato and, like you say, it didn’t have the same magic. From what I was told, it used to work, but it seems they’ve changed their formula.
LikeLike
I’m glad it worked for you. What I meant about Kato though, was not to try it with cornstarch. The baking soda works beautifully with Kato for me. So did you use cornstarch or baking soda? I’m curious whether it worksl with cornstarch on other brands.
LikeLike
Oh, I should clarify. I used it on newly purchased Kato within the last two weeks, it’s my go-to method for Kato. I would be interested to figure out why it didn’t seem to work as well with the Katoclay for you.
LikeLike
Last August I did some tests with Kato translucent buried in baking soda or cornstarch in an aluminum tin at 290˚, 300˚ and 310˚ for an hour each. The one at 290˚ didn’t change color too much, but it broke in half when I tried to break it. The one at 300˚ turned tan, the one at 310˚ turned orangish. The last two didn’t break. All had big plaques. I’d had the clay for a while, but not longer than two years. I used the same method with Fimo and it was beautiful.
LikeLike
I just found your article, and really appreciate your methodical approach. I also liked the cornstarch and baking soda recommendations. I will have to think further on an ideal support and thermal mass alternative. This method has a lot in common with other casting disciplines, so it has me thinking in a new direction. Thank you both for that 🙂
Some of your baking / food science parallels are mechanically fallacious. With as scientifically minded as you approached this I wanted to offer to point you to better sources. I couldn’t find a way to directly e-mail you, and I don’t want to fill your comments with food science.
Thank you again for all the pictures, comparisons, and everything. You saved me a lot of time!
LikeLike
Thanks for your comments! I’ll email you separately.
LikeLike
Hiya!
So glad I found this page, definitely going to try the double baking technique. My Fimo translucent seems to have this plaguing issue and it’s frustrating 🙈
This may be a silly question but with the baking temps, are they in Celsius or Fahrenheit?
Many thanks!
LikeLike
I hope it works for you. The baking temperatures are in Fahrenheit.
LikeLike